

Pysanky Egg Art
Last week, we shared in our journal about the traditions behind Easter eggs. One of the traditional egg dying techniques we mentioned is pysanka or pysanky; which originates from the Ukranian word that means to write. Pysanky eggs, originating in Ukraine, are part of an ancient tradition pre-dating Christianity. The tradition of dying or painting eggs dates is ancient. The first decorated ostrich egg shells date back nearly 60,000 years ago.
Pysanky eggs are decorated using a wax resist method to layer colors onto an egg. Melted wax is applied to the egg in patterns using this tool called a kistka. It's like painting with wax. This year we tried our hand at dying our eggs using this method. It was a slow and meditative process and I just absolutely loved it. It is an art form of its own and there was something beautiful about the creation of something so detailed.
As the legend goes, the more colors on an egg, the more magic the egg contains. The storytellers say that somewhere in the world there is a giant serpent chained to the mountains. If the amount of painted eggs increases in the world from one year to the next, the serpent's chains are tightened. However, if the number decreases, the serpents chains are loosened. So the ancient art must continue to flourish!
This is a step by step process of how to create your own eggs. You can purchase all the tools you will need here. We only did one layer of color for our egg, because we are beginners too, but ideally you would do multiple colors starting with your lightest color and finishing with your darkest. I will definitely be doing this again before Easter and experimenting with multiple colors.
Prep your dyes first. You can use commercial food coloring, natural dyes, or easter egg dyes. To make them more colorfast, use hot water and one tablespoon of vinegar. Let your dyes cool to room temperature while you get to work on the fun part: designing your egg pattern.

So we worked out our simple leaf design first in pencil, just to give us some consistency and direction to our pattern as we paint with wax.
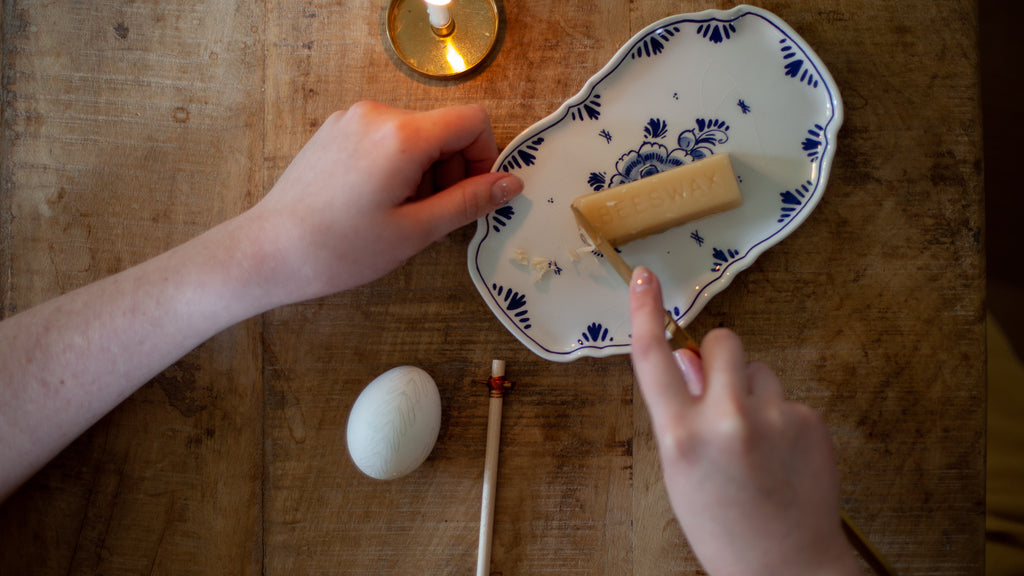
Next take a knife or a vegetable peeler and shave off little pieces from your beeswax block. Take the little shavings and pack them into your kistka which is basically just a tiny metal funnel attached to a stick.

Next, you need to melt the beeswax, in your kistka, over an open flame. Basically you heat the metal funnel and the beeswax stays warm and liquid. We used our Sanctuary candle holder and it was so ideal for this, because any little wax droplets were contained in the candle holder.

Once your wax begins to run, you begin tracing your pencil design in wax. After the design is drawn, the egg is placed in a dye bath.

Check your egg every once in a while, just to see if it has reached the color you want, take it out. Once the egg is taken out, of the dye. it is left to dry. This can be done in stages with different colors each time. I would getting several eggs going so that you can transition between dye baths and drying times.

Then the wax is either scraped or melted off. We melted ours off using the same candle we used to heat the kistka. This was super easy and helped not to damage the egg. One word of caution, don't let the egg sit too long near the flame or you will get carbon stains!

We hope this was helpful and that you enjoy creating your own pysanky eggs! Also, we have video version of the process on our Instagram (IGTV).

Comments
Lauren said:
Your links don’t work for the supplies but it looks so lovely!